Lab Setup
Lab Code Repository
The source code for the labs is hosted on GitHub. You can access the repository using the following link: https://github.com/GitHub-Insight-ANZ-Lab/aiapps-agents-in-a-day
The repository contains the following folders:
- Lab exercises:
~/labs - Chatbot Backend Node.js API:
~/apps-chat/backend - Chatbot Frontend React Web App:
~/apps-chat/chatbot - Game Server:
~/apps-rps/rps-game-server - Game Client:
~/apps-rps/rps-game-client - Game Agent:
~/apps-rps/rps-game-agent - Game MCP Server:
~/apps-rps/rps-game-mcp - Bicep Deployment:
~/infra
Lab Environment Setup
- GitHub Codespaces (Recommended)
- Local Computer
Follow the steps below to set up the lab environment using GitHub Codespaces:
-
Create a GitHub Account: If you don't have a GitHub account, you can create one here.
-
Open in Codespaces: Navigate to the aiapps-agents repository. Click on the "Code" button and select "Open with Codespaces". If you don't see this option, ensure you have GitHub Codespaces enabled for your account.
-
Create a New Codespace: Click on "New codespace" to create a new development environment. This will set up a Codespace with all the necessary tools and dependencies pre-installed.
-
The Codespace will take a few minutes to set up. It will install the following tools and dependencies for you:
- Start Coding: Once the Codespace is ready, you can start coding and follow the lab instructions directly within the browser-based VS Code environment. The changes you make in your Codespace are saved automatically. If you stop and restart your Codespace, your changes will persist.
Note - You can also connect to your Codespace from your local VS Code editor by installing the GitHub Codespaces extension.
-
Install the following tools on your machine:
infoIf your device has restrictions, you can download the
VS Code,Node.js, andAzure CLIzip packages. Then, add theNode.jsandAzure CLI\binfolder paths to your environment variables. You will need to restartVS Codefor the changes to take effect.set PATH=%PATH%;C:\your\path\here\; -
Visit our aiapps-agents repository in GitHub. This repository contains the source code and guides for completing the labs.
git clone https://github.com/GitHub-Insight-ANZ-Lab/aiapps-agents-in-a-day.git -
Navigate to the repository folder and open it in Visual Studio Code:
cd aiapps-agents
code .
Windows Sandbox
If you are using Windows, you can easily start up a Windows Sandbox to keep your local machine clean. Read more https://learn.microsoft.com/en-us/windows/security/application-security/application-isolation/windows-sandbox/windows-sandbox-overview
Run the following command in PowerShell to enable Windows Sandbox feature:
Enable-WindowsOptionalFeature -FeatureName "Containers-DisposableClientVM" -All -Online
Once restarted, search Windows Sandbox in Start button.
Lab Azure login
Let's now claim your Azure login in the demo Azure tenant.
-
Go to https://aiaaa-s2-setting.azurewebsites.net page in browser, and sign in with the password (the password will be shared during the day)
-
Navigate to
Azure Loginpage and findClaim a loginsection -
Claim a Azure login by entering
Your Nameso that we can retrieve this login later. -
Once claimed, you can see Azure
login email,passwordandregionin the table. Make a note of the information, save them to a local notepad file. You will need these details later on.
Lab Configuration & Verify Connection
Next step is to test the connection to Cosmos DB instance and OpenAI service.
-
Open VS Code and navigate to the
aiapps-agentsrepository folder. If you are using Codespaces, you should already be in the repository folder. -
Navigate to the setup folder
~/labs/00-Setup/within the repository. Go toTerminalwindow in VS Code.cd labs/00-Setup/ -
Open
setup.sh, let's update<DEV_Name>setting with the Azure login name you claimed earlier. e.g. if you azure login islab1user310@aiapps.top, then enter<DEV_Name>aslab1user310. Replaceadd_valuewith your assigned lab username (for example:lab1user310).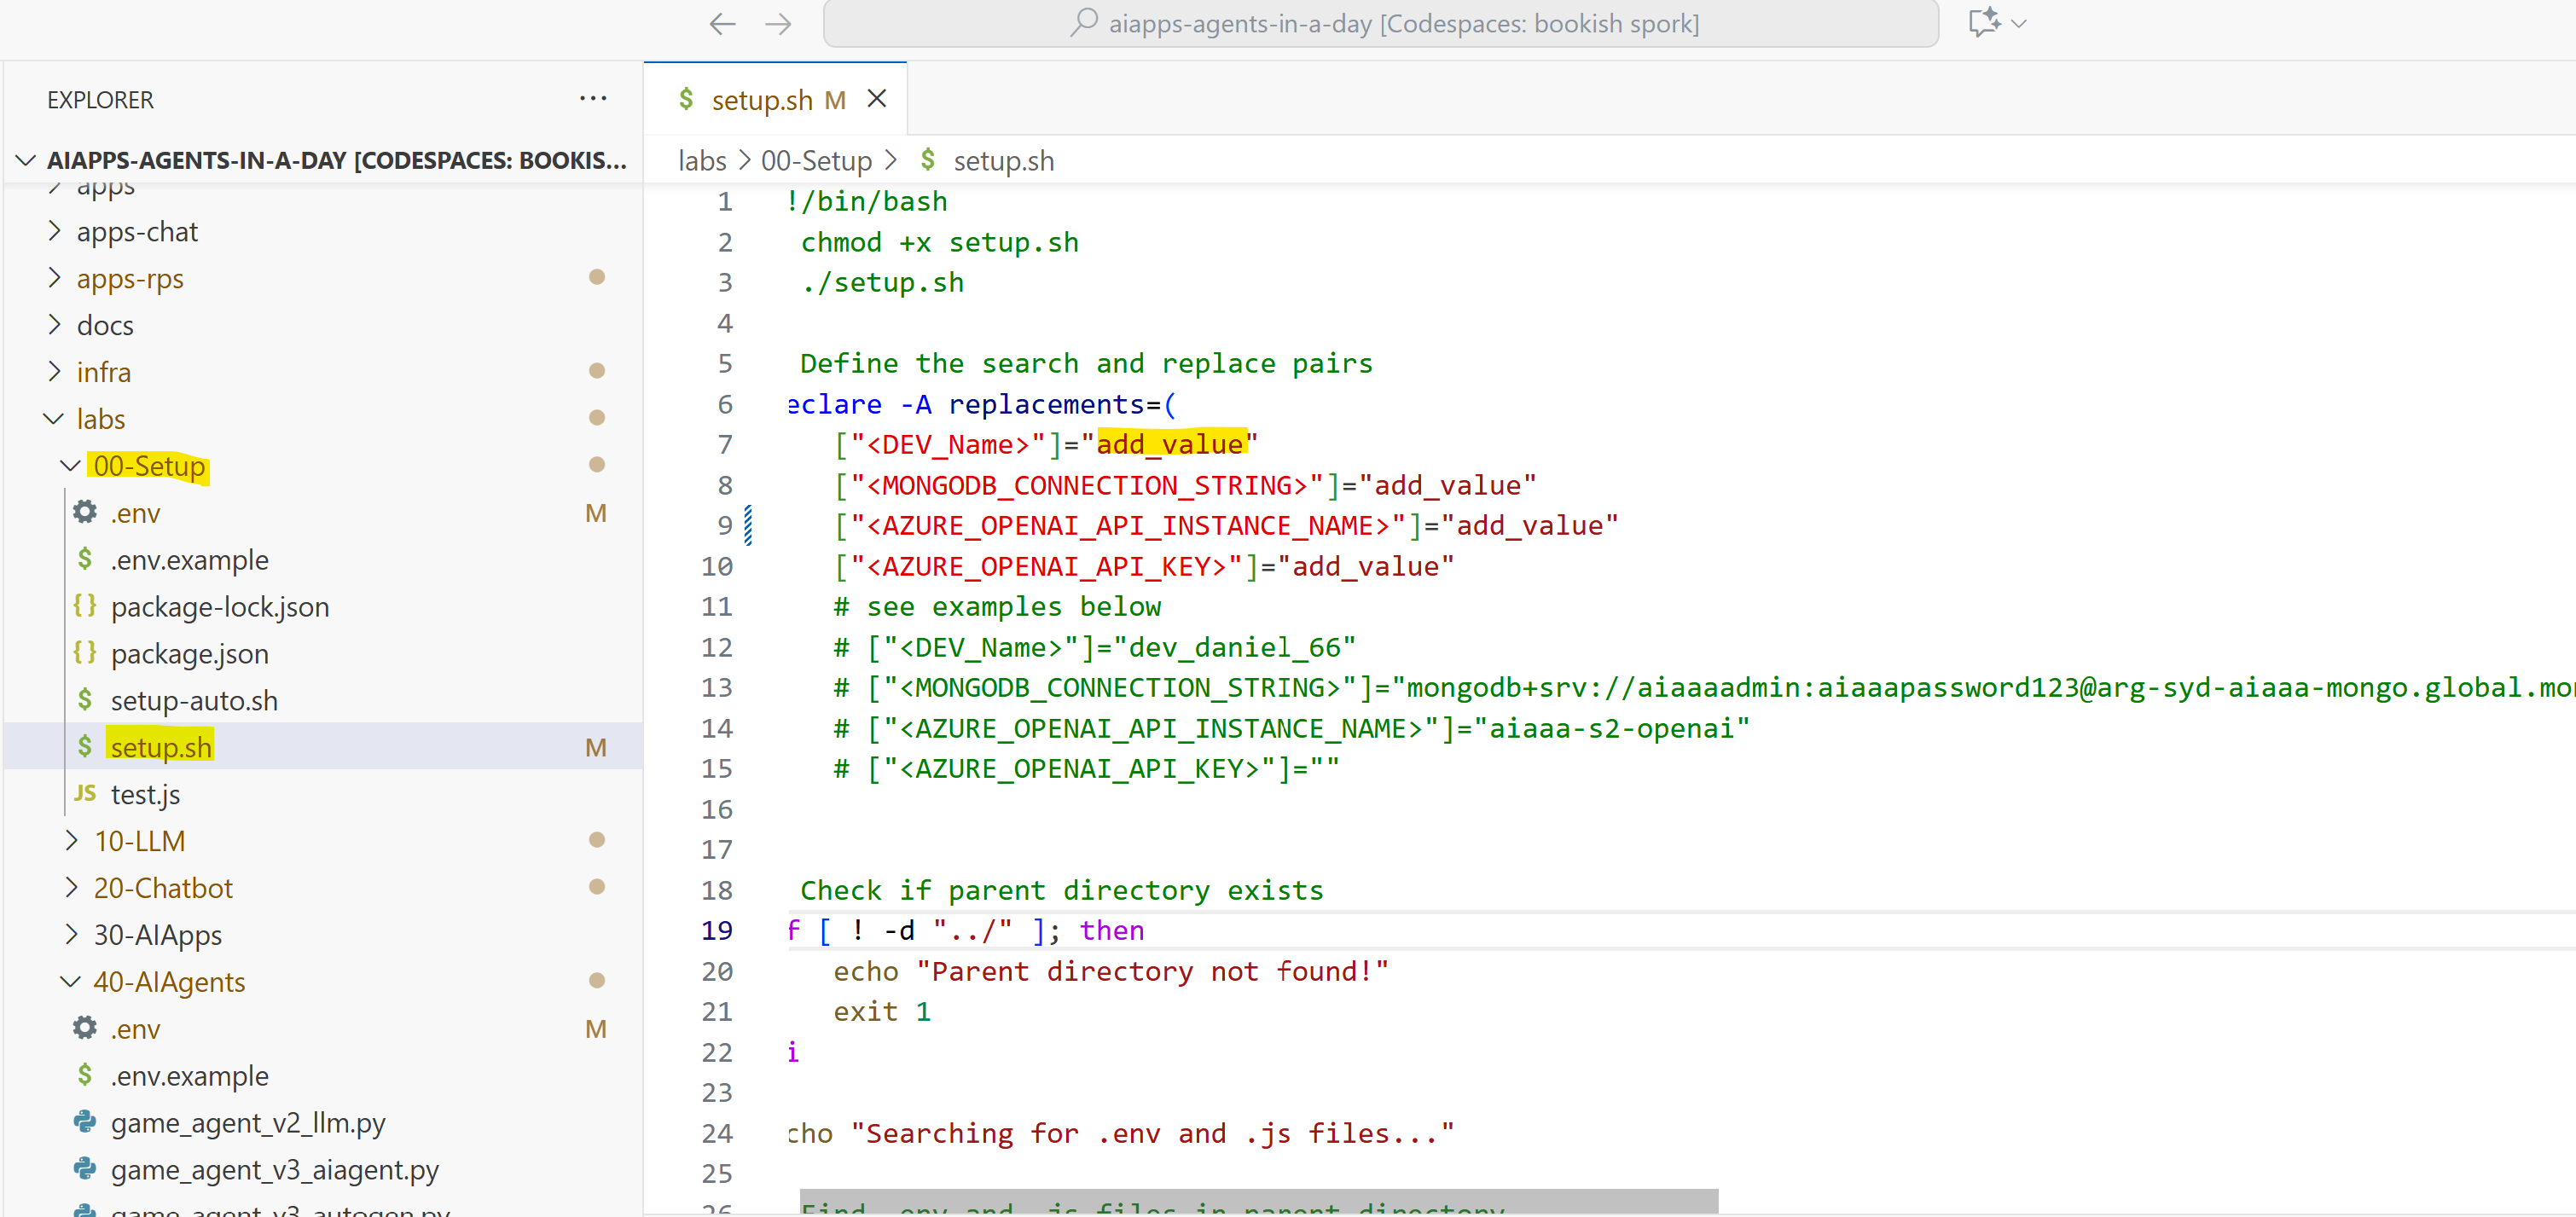
-
Use
GitHub CopilotAgent Mode to Update the Script Automatically. Instead of manually editing the.shscript file, you can use GitHub Copilot in Agent mode to automate this process:-
Locate and open
setup.shscript -
Open
GitHub Copilotin VS Code by the icon on the top and selectAgent modeas shown in the screenshot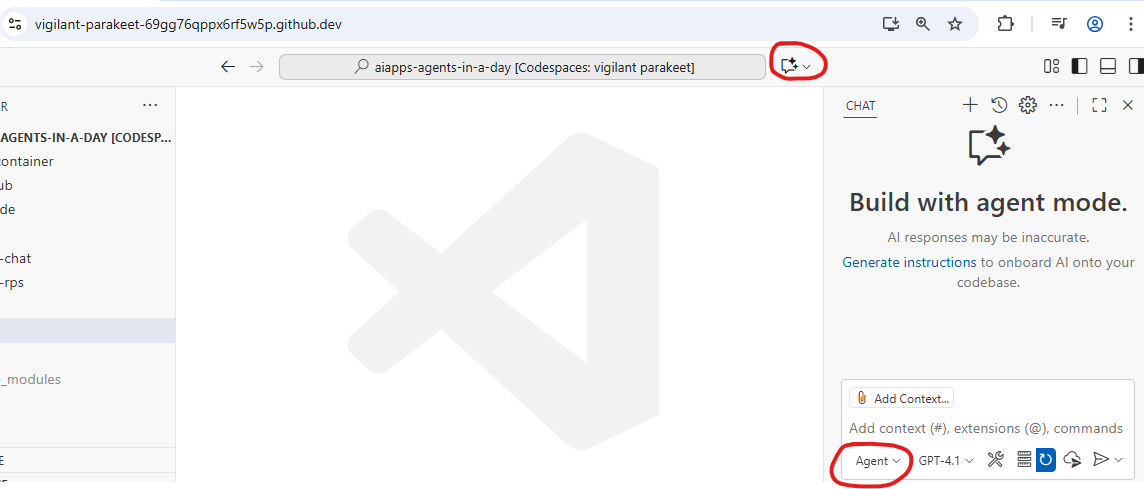
-
Go to https://aiaaa-s2-setting.azurewebsites.net/api/configuration/all in browser, and copy all the configuration values
-
Paste copied values into the
Copilot chatas shown in #1 (don't submmit yet) -
Then append instruction
replace the <MONGODB_CONNECTION_STRING>, <AZURE_OPENAI_API_INSTANCE_NAME>, <AZURE_OPENAI_API_KEY> values in the scriptin the same textbox, as shown in #2. -
Finally, submit the chat by
Enteror clickSend iconas shown in #3
-
Copilot will update the script for you by replacing placeholder values. Click
Keepto accept the changes. No manual editing needed!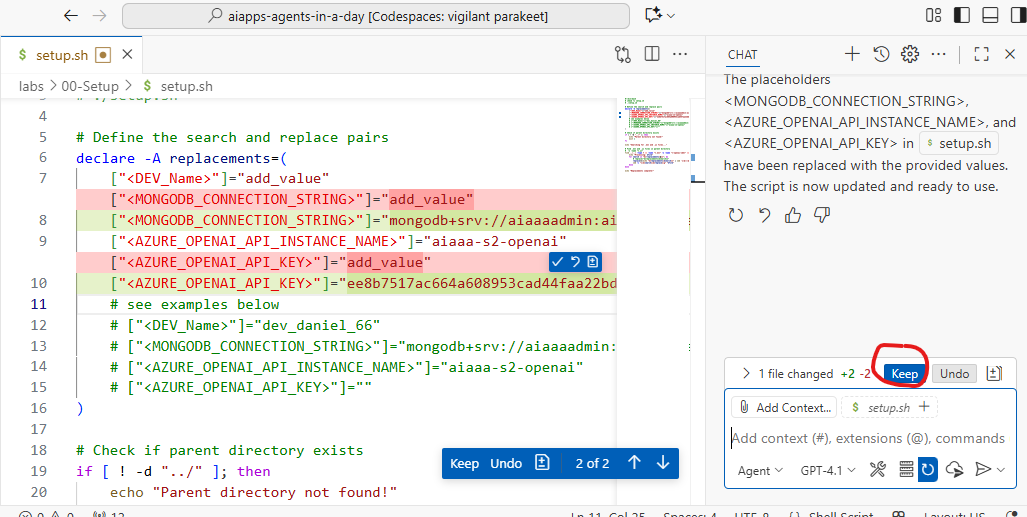
infoThis demonstrates how GitHub Copilot can help with real-world development tasks and automation.
-
-
Go to terminal windows, save the
setup.shfile and run below bash command to replace all variables in the repo. If you need to runsetup.shagain to fix typos, you need to revert previous changes inSource Controltab or ask us for help.chmod +x setup.sh
./setup.shPlan B (Skip if Step 5 worked)
If the above step does not work for you, use the
setup-auto.jsscript to automatically fetch all configuration values from https://aiaaa-s2-setting.azurewebsites.net/api/configuration/all and replace the placeholders in your setup script. Run it to complete the replacement process.-
Check and revert any file edits in the VS Code git tab. The setup script can only be run once.
-
Open
setup-auto.sh, let's update<DEV_Name>setting with your own database name. Replaceadd_valuewith your assigned login namelab1user310(for example: lab1user310).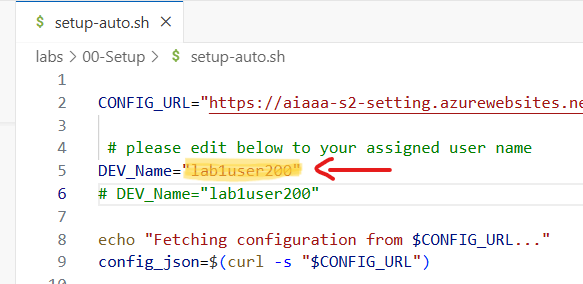
-
Run below script
chmod +x setup-auto.sh
./setup-auto.sh
Plan C (Skip if Plan B worked)
If you have issue running above script, you can also carry out variable replacement manually.
- Switch to VS Code
Searchtab, replace<DEV_Name>placeholder with your own database name. - Search for
<DEV_Name>and replace with your assigned lab username (for example:lab1user310). - Then click
Replace Allicon, there will be multiple items to be replaced. The placeholder string will be replaced in the whole repo so that you have a dedicated database on the shared Cosmos DB instance.

-
-
Install node packages for test program.
npm install -
Test Connection to CosMos Db and OpenAI service. Run the following command in the terminal window to execute the script:
node test.js -
If you see below message in the console, you are ready to go! otherwise, please
Raise your hand and ask for help. Note, you do not need to commit any changes of the.envfiles to Git repo.
Azure Resources Information
The Azure Resources required for the labs have already been provisioned. The details of the shared Azure resources are provided in the table below. You will need these details to connect to the Azure services during the labs. This section is for your information only.
If you have an Azure Subscription, you can provision these resources yourself using the instructions and bicep files provided on the Azure Deployment Guide page. However, this is optional.
You can also create a free Azure account with $200 credit to use on Azure services within 30 days. If you are a Visual Studio subscriber, you can activate monthly Azure credits. Refer to the links below for more information.
Azure AI Proxy Playground
| Description | Value |
|---|---|
| AI Proxy Playground | https://aiaaa-s2-playground.azurewebsites.net |
| Azure OpenAI API Key | Retrieve from https://aiaaa-s2-setting.azurewebsites.net |
Azure OpenAI Resource Configuration
| Variable Name | Value |
|---|---|
| AZURE_OPENAI_API_INSTANCE_NAME | aiaaa-s2-openai |
| AZURE_OPENAI_API_ENDPOINT | https://aiaaa-s2-openai.openai.azure.com// |
| AZURE_OPENAI_API_KEY | Retrieve from https://aiaaa-s2-setting.azurewebsites.net |
| AZURE_OPENAI_API_DEPLOYMENT_NAME | completions |
| AZURE_OPENAI_API_EMBEDDINGS_DEPLOYMENT_NAME | embeddings |
| AZURE_OPENAI_API_VERSION | 2023-09-01-preview |
Azure Cosmos DB for MongoDB
Cosmos DB is used as the database for the chatbot. During the lab exercises, you will populate the database with sample data. You are required to create a new database with a unique name in the shared Cosmos DB instance.
The database name could be in the format aiaaa_{your_name}_{your_lucky_number} so that you have your own copy of data.
You should remove the curly brackets {} and replace the placeholders with your name and a lucky number.
| Variable Name | Value |
|---|---|
| MONGODB_CONNECTION_STRING | Retrieve from https://aiaaa-s2-setting.azurewebsites.net |
| MONGODB_Name | aiaaa_{your_name}_{your_lucky_number} |
| MONGODB_Name (for example) | aiaaa_daniel_55 |
API keys and connection details will be reset after the lab session.
Azure AI Resource Configuration
Retrieve below keys from https://aiaaa-s2-setting.azurewebsites.net
| Resource Name | Endpoint | Key |
|---|---|---|
| GPT-4o | https://aiaaa-s2-openai.openai.azure.com//openai/deployments/gpt-4o/chat/completions?api-version=2024-08-01-preview | (deploymentName: gpt-4o) |
| Computer Vision | https://aiaaa-s2-cv.cognitiveservices.azure.com/ | |
| Translator Service | https://api.cognitive.microsofttranslator.com/translate?api-version=3.0&to=xx&from=xx | |
| Speech Service | https://eastus.api.cognitive.microsoft.com/ | (region: eastus) |
Optional: Connect GitHub Copilot & Copilot CLI
These steps are optional and not required for the core lab, but are recommended for enhanced productivity and automation.
A. Connect Your GitHub Copilot License
If you have a GitHub Copilot license, you can connect it to your VS Code environment for advanced code suggestions and AI-powered assistance.
To sign in to GitHub Copilot in VS Code:
- Open VS Code.
- Open the Command Palette (
Cmd+Shift+PorCtrl+Shift+P). - Search for
GitHub: Sign inand follow the prompts. - Ensure Copilot is enabled in the Extensions sidebar.
For more details, see the official Copilot sign-in guide.
B. Install the Copilot CLI
The Copilot CLI lets you use AI-powered commands in your terminal, such as /context which provides details on the codebase.
Please see the Copilot CLI Installation instructions if you wish to use this tool.
For more information and usage examples, see the Copilot CLI documentation.